Pages

Saturday 27 December 2014

A special Winter birthday Angel.

Today I want to share a card I made for a special person who has a winter birthday, she loves animals, and also believes in Angels, so I thought this Sara Burrier image would be perfect
 
 
I have coloured her with my Spectrum Noir pencils onto Sheena Douglass stamping card, as it has just the right amount of texture for me
  
 
The colours I have used are:
Skin: 005, 008, 009, 089
Hair: 089, 091, 100
Dress: 077, 079, 081
Wings: 004 055, 116
Chipmunks: 091, 095, 097
 
I hope my card inspires you to get creative, we love to see your work too, so feel free to share with us at the Spectrum Noir Facebook page,
 
Happy colouring
Nicky x
 

Wednesday 24 December 2014

Super easy shine on a round object!

Happy Christmas eve everybody
 this is a rewrite of one of my missing posts!!!
 I  shared a tutorial on the 8th December on how to get a shine on a round object, in this case a bauble,


 I  have made it super easy so any one can do it! just follow the link here.
There is a wealth of knowledge from all the designers over on the Spectrum Noir blog, so if you ever need inspiration its definitely the place to go!

 
Happy colouring everyone,
Nicky x
 

Tuesday 23 December 2014

Uh-Oh, its all gone a bit pete tong!!!

So there I was basking in the knowledge that I had a whole month scheduled on my blog, so that I could just get on with all the family stuff, you know shop, wrap, make, repeat..., and a friend of mine casually say's "what's wrong with you? nothing new on the blog?" so I checked.... nothing, not a dickie bird, everything from the past month has vanished into who knows where, and no they aren't
in draft format or anywhere else to be found. Now for the past 3-4 months blogger really has been messing me around, sending me error codes that lead nowhere, disappearing text and photo's but this has reached a new level! I think the New Year may have to herald some changes, any suggestions will be gratefully received! 
So I now have to find the time to re-do everything starting today with this one...
 
 December Challenge at Spectrum Noir -CAS
 
 
I drew this little chap myself, and coloured him with my Spectrum Noir pencils, I didn't use any blending solution and kept my pencils sharp, I then decorated the card very simply.
 
You still have a few days to enter the challenge over on the Spectrum Noir Facebook page, the theme this month is Clean and Simple, you can enter here.
 
 
I hope I have given you a little inspiration to create you own clean and simple card, and as always we love to see your creations.
And before I forget, there is also a competition running at the moment for you to win one of two complete sets of the blendable pencils, so while you are there enter that too!!
 
Happy colouring
Nicky
 

Sunday 30 November 2014

Christmas paper piecing.

Wow can you believe tomorrow is December, I can not believe it has crept up on me so quickly!
Well there is just enough time to share this cute card with you, I have coloured some area's and paper pieced others.
 
 
I have coloured the face, hair and tights with my Spectrum Noir pencils in the following colours:
Hair: 087, 102, 089
Face: 004, 005, 009
Bells: 016, 014, 019
Tights: 024, 047
Shading on clothes: 024, 106, 047
White gel pen for highlights.


So where did I get my inspiration? from the spectrum noir blog of course!
I followed a tutorial from the lovely Kalina Pavlova for paper piecing, she shows step by step instructions on how to do it with fabulous colour photos throughout.
 
Well I hope you Christmas crafty preparations are in full swing,
Happy Colouring,
Nicky x


Thursday 27 November 2014

Spectrum Noir November Challenge

Here's a little reminder, you have just a couple of days left to enter the November challenge over on the Spectrum Noir Facebook page, and if you need a bit of inspiration here's the card I made!


The theme this month is Winter/Christmas, the image is from the Crafters Companion's vintage Christmas CD-Rom and I coloured it with my Spectrum Noir blendable pencils, I used: 
 
       Mistletoe: 56, 47, 58
Berries: 4
Bells: 15, 20, 22, 89
Bow: 5, 9
Background: 4, 89
 
 
I also used the blending solution and paper stumps.
You can enter your card here.
 
Thanks for stopping by today,
Happy Colouring!
 
Nicky x


Thursday 20 November 2014

A Bebunni birthday.

Today I want to share a card I made for the first birthday of the shop The Mulberry Bush, which if you didn't know is where I do my day job!
I can not believe it has been a year since Cate took over, she has worked tirelessly getting the shop looking so gorgeous and full of pretty and exciting new things.
(I know, I'm such a lucky girl working in such a gorgeous little craft shop!)
 
So I thought to celebrate, gorgeous little Bebunni would be just the ticket,
 
 
His cake looks good enough to eat!
I coloured him with my trusty Spectrum Noir pencils, and the background is made using the new Spectrum Noir Aquatints, pretty pastels set, I also used the same set to colour my doily!
 
Here is the list of colours:
 
Inner ears: 34, 91, 76
Fur: 117, 76
Icing: 34, 76, 117
Blue buttons: 61, 63
Cake: 91, 95, 98
Candle, jam, pink buttons: 39, 42, 76
Flame, yellow buttons: 10, 13, 17, 22
Orange buttons: 20, 22
Thanks for popping in today, If you like my project a comment would be very much appreciated x
 
Happy colouring
Nicky x


Wednesday 12 November 2014

Yay! I'm back in the land of technology!

My apologies for not being able to post anything, my computer has been away getting fixed as its been a little poorly, and I have had a few funny old weeks!

But I'm back and raring to go so here's a wee something to get me back in the swing!

 
Isn't it cute?
I made it using the new Big Score from Crafters companion,
 
 
 The box itself is covered on the
 CD-Rom that came free with the board, and as soon as I saw Sara Davies showing how to make it I knew it had to be a ginger bread house.
 
 
To cover the outside of the box I drew around the two ends and stuck them on with collall tacky glue, and made a couple of windows and a door, Then I measured the remaining panels and covered them with Kraft card and the roof in pearlescent card that I embossed, I already had the ginger bread men and candy canes cut out (saved from last year!) I added  Glossy Accents to the canes.
 
 
I made the wreaths and sparkly jelly tots using my hot glue gun onto a non-stick craft sheet, while they were still hot I dumped glitter all over them, then waited until they were completely cool before removing them and returning the glitter to their pots.
 
 
The "boiled sweets" were made by punching a circle of card then covering with tacky glue then I spiralled bakers twine to cover the circle, when dry I then gave them a good coating of glossy accents, which did take over 24hrs to go completely dry, so beware this isn't a quick project!!

 
To finish I dripped tacky glue on the pitched roof and sprinkled with iridescent glitter, unfortunately Collall tacky glue being so good it dries completely clear, so I then had to use my chalk ink blackboard pen to paint back in the "snow"!
 
 
I hope you like my little Gingerbread House, and if you missed out on the fabulous birthday deal of the Big Score and Free CD-Rom, don't worry we still have a couple left over at the shop from our first birthday free demo day
 
Thanks for joining me today and remember...
Happy colouring
Nicky x


Friday 31 October 2014

Ribbon Butterflies.

Morning all, does anyone want to know how I made the ribbon butterflies on the card that I recently made for the October challenge?


well if you do hop along to the spectrum noir blog as I have written a blog post to show you just how I do them!

 
Have a go they are dead easy to make! (the only Halloween reference today!!)
 
Happy colouring
Nicky x

Monday 20 October 2014

Simply Sepia.

Happy Monday, Hope you are all in fine fettle this sunny morning.
Today I am sharing a card I recently made for my uncle and auntie who have moved house.


  I just could not resist using the beautiful Moonbeam meadows birdhouse stamp for this one, but how to colour?
Well I know I need a lot more practice with my SN Alcohol Markers so that was a good place to start, but as yet I haven't found time to work out all the best combinations, so I hopped over to the Spectrum Noir Blog and found a tutorial for Sepia, perfect for the image!
 
Kalina has written the most amazing tutorial, with a full colour photo for each stage. 
It was easy to follow and the combinations were great.
I stamped the image onto Neenah Desert Storm cardstock, then started to colour!


The colours I used were:
Leaves: GB8, GB11
Flowers & bow: TN1, TN2, TN3
Roof: TN6, TN8, TN9
House: TN3, TN5, TN7
Birds: BG1, BG2, BG3
All the shadows were BG7,
I also forgot to leave some highlights on the roof so took my trusty 001 SN pencil and added those in.
I then used pencil 095, to enhance the shading slightly.
 
I hope you like my cute little card, and if you want to give Sepia a go then you will find Kalina's tutorial here.
 
If you don't already know, its Crafters companion Birthday week and there is lots going on over on their website all this week, so if you would like the stamp I used take a look here, you might find a few more things to add to your basket!
 
Happy colouring
Nicky X


Thursday 16 October 2014

Monochrome Christmas!

I wanted to share with you today a monochrome Christmas card.
 
Ok...hands up if you thought monochrome means black and white?
well you wouldn't be alone, most people think exactly that, but it does in fact mean one colour!
So I picked purple Spectrum Noir alcohol markers!
I don't know why I picked it, as its one of my least favourite colours but I did, and I was super pleased with the results.
 
 
To colour my baubles I used:
 HB1, HB2, HB3
and
LV1, LV2, LV3

 
To make the background I used the same HB1, HB2 and HB3 pens to scribble onto some acetate and then used a Tim Holtz blending tool with blending solution on it to move the pen around, and when dry I mounted it onto some gold mirror card, as a white card was too stark and overpowering. I think the purple and gold give a richness to the background.
 
The stamps are from Sue Wilson and they also have a matching die set to enable you to cut them out, the possibilities are endless with them!
 
Thanks for being here today, if you would like to leave a comment I would really appreciate it.
Happy colouring everyone
Nicky x


Monday 6 October 2014

Autumn has definately arrived!

Wow, today could not be any more different than the beautiful sunshine of yesterday, so I think it is fair to say Autumn is upon us, but it is my favourite time of year as I love all the beautiful colours of the season, but I do think we should adopt the American word fall for this time of year as it seems so much more appropriate!
With that in mind I set about trying to use the lovely oranges and reds, browns and earthy greens on a card and when I made this one it just had to be for this months challenge, is this month going to be the first time you enter the Spectrum Noir challenge over on the Facebook page? or are you a seasoned challenge entrant? Either way we just love seeing all your creations.
 
 
The theme this month?...Embellishments! And yes I did go a wee bit mad!
 
The colours I have used on the beautiful Sara Burrier stamp are:
Hair: 111, 120, 69, 102
Skin: 101, 106, 111, 86, 6
Dress: 020, 22, 57, 58, 59
Wings: 6, 9, 20, 81, 120
 
 
Embellishments can be anything, from little tiny punched butterflies, to flowers with button centres.
 
 
I love these colours! 

 
Ribbon also constitutes embellishment! I have turned this wired hessian ribbon into a butterfly to keep with the theme, I coloured the flower stamens with marker OR2 and used them to make antenna! 

 
You can enter your challenge card here, and keep an eye out for the design team cards, they are all stunning this month.
 
 
Keep an eye out later this month as I will be showing you how to colour this beautiful fairies dark skin, and how to make the ribbon butterflies.
 
Thanks for your company today x
 
Happy colouring
Nicky x

Thursday 2 October 2014

A cheeky little extra!!!

Evening all! I have a cheeky little extra post for you this evening, as it occurred to me a tool I find useful may be just what you need to help you with your colouring!
So what is it I hear you all cry??? well most of us these days have smart phones, and its what I use on a daily basis to photograph my work, as my camera is too much faffing around with, linking cables excreta, and, most of the time! photos are instantly available on my laptop thanks to that mysterious object "The Cloud!  (get to the point...)
So " why is all this waffle gona help me?" I hear you screaming...

 When I have coloured an image I take a photo, then I use the filter function in the edit bit to turn it black and white, this way I can check to see if my shading is correct, and if I need to add any more shade or if I've gone a wee bit over the top... here's an example


This is the original photo, and there was something wrong and I couldn't work out what, so...


I used the black and white filter to check, and while most of it was just right, the part by her arm and bust was completely wrong, and consequently I won't be using her on a card, its a great little aid to use and although it might seem time consuming to recolour something I'm not happy with, it means that only my best work gets through. 
 
Give it a go and let me know in the comments how you got on, and have fun with it.
 
Night all,
Happy Colouring
Nicky x

Tuesday 30 September 2014

Creating a dark sky background.

Have you ever wanted to give your stamped image a really dark night sky background?
Well if like me you wanted to give it a go, you can find a fabulous tutorial by Dilyana on the Spectrum Noir Blog, and to make it easy for you here's a cheeky little link!!
Here's my version, using the Spectrum Noir markers, the stamp is from new Moonbeam Meadow collection from Crafters Companion, the images are all so cute it was hard to choose, but as I believe in angels it was fitting to use this cutie!

I used Spectrum Noir Alcohol Markers as well as my Spectrum Noir pencils!
The colours are:
Background: TB4, TB5, TB6, TB9
Moon: CT2, CT3, OR2, 020, 089
Stars: CT4, OR2, 015 
 
 
Skin: FS3, TN2, 091
Hair: TN3, TN4
Dress: TB1, 073
Wings: BT1, 117
 
I hope you like my take on dark sky, I certainly enjoyed a new challenge, and don't forget that there are lots of tutorials on the SN blog, there's all sorts to get your creative juices going!
 
Thanks for coming by today, Happy Colouring
Nicky x


Friday 26 September 2014

Spectrum Noir Tutorial Sillhouette background.

So today is my turn to share a tutorial over at the Spectrum Noir Blog, if you would like to find out how I created this funky little background that YOU can create with your pencils and blending fluid, click on the link here

 
It works perfectly in conjunction with the Die'sire Christmas range, I couldn't resist this beautiful Nativity scene.


Don't forget that it's not just a technique for Christmas, try using pastel colours and adding a fairy for instance!
 
I love to see what you create with your pencils and today I am in the shop for our Macmillan Coffee Morning, so bring your colouring along and let me see your creations, there is a great raffle and you could also have a go at decorating your own cupcake, I will be on hand to offer any advice you may need (on colouring not decorating the cakes!!!)
 
Thanks for stopping by today,
 
Happy Colouring
 
Nicky x

Thursday 18 September 2014

Fairy sure I love these stamps!

 
Good morning everyone, today I want to share a recent commission card that I made, I had no brief whatsoever, but knew that the last Sara Burrier card that I shared was popular so I chose another of her stunning digi stamps, you can check them all out here.
 
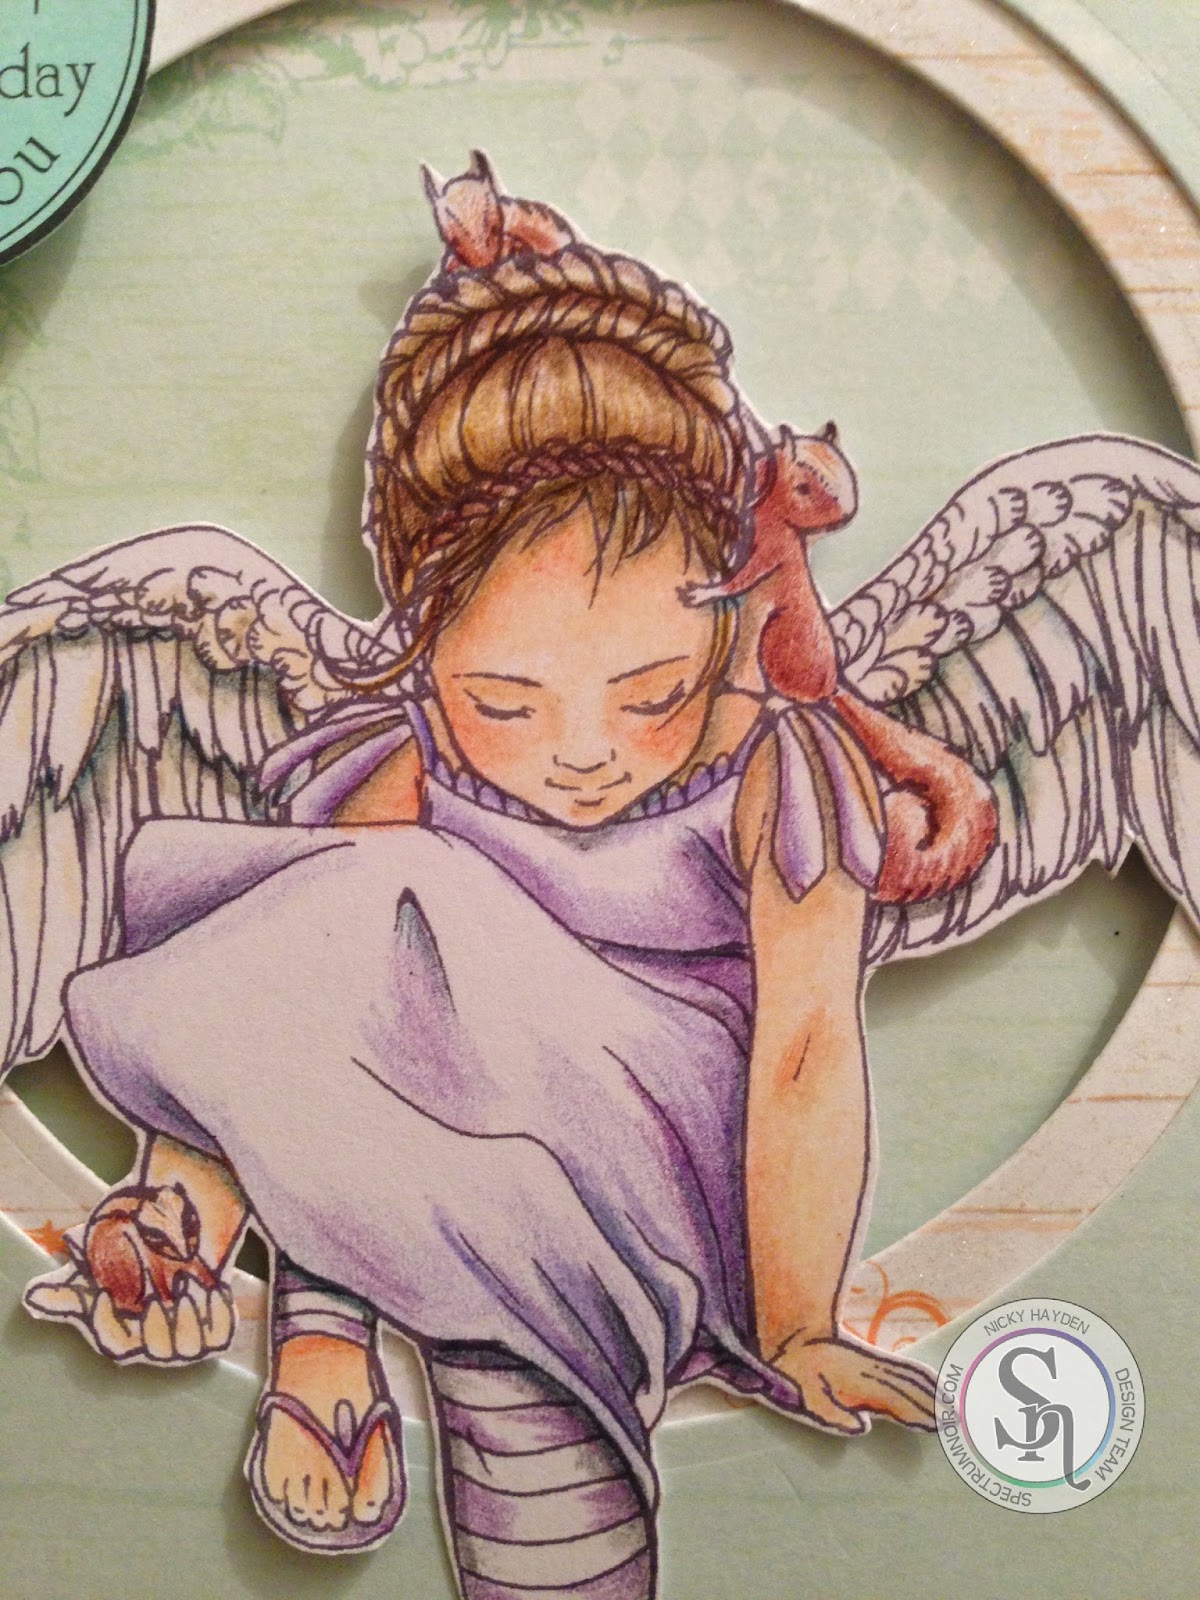
I of course used my gorgeous Spectrum Noir pencils, and thought I would give you quick step by step skin and hair tutorial.
 
 
Firstly I started by putting in the shading, why do it first I hear you ask? because it cuts down blending time later! I used 088.
 
 
Next I used 008, going into the white area a bit more blending over the first pencil as I go along
 
 
Then I went over these with 005, again blending into the second colour and then added 004 as the last skin colour.

 
I then went back in to really deepen the shadows with 109, but was very sparing with it. 


Then her hair...after colouring her ear (bet you didn't even notice!) I started by going all over with 084, pressing slightly harder in the darker areas.

 
Then onto 088, this acts as a link between hair and skin!

 
Then I used 095 to really darken the shadows, I don't tend to blend hair I think it looks more natural without.
 
 
Then I finished colouring the image in shades of blue and turquoise
 
 
The rest of the colours are:
Dress: 062, 064, 063, 055
Bodice: 050, 052, 055, 063
Wings: 061, 056, 055
Moon: 074, 055
Ribbon: Spectrum Noir Marker IB2
 
I hope you are all loving your pencils as much as I love mine, and remember to practice lots, as you can't improve a blank page!
 
Happy colouring
Nicky x


Sunday 14 September 2014

Friendship - it's a challenge!

Wow, its September, Happy the little peeps are back to school and life can get back to its usual routine? I know I am!
 
So what does this month have in store?
Well there is a new challenge over on the Spectrum Noir Facebook page, this months theme is:
 
Friendship
 
The design team have been hard at work creating some beautiful cards that you will get to see over the next few weeks and here's mine!
 
 
The image and friendship poem are from Lili of the Valley, and the papers are a My Minds eye 6 x6 paper pad called In Bloom.

 
I just love this little poem, I for one am very lucky and have 5 of the best and most wonderful friends anyone could wish for, and these words make me think of them instantly.
 
I stamped onto Neenah Desert storm paper with brown Memento, and coloured in with my pencils,
the colours are:
Skin: 001, 008, 091
Hair: 001, 004, 006, 085
Dress: 001, 028, 032
Socks: 001, 031, 032
Bear on Drawers: 001, 089
Drawers: 001, 101, 102
Bear hug: 001, 110, 111
Background: 001, 009, 115
Shadows: 102
 
I also coloured the ribbon with a SN Alcohol Marker CR2.
 
Don't forget there is a prize for the winning challenge card so get those pens and pencils out and join in, you can add your card here!
 
I'm going to finish today by dedicating this to my friends, Rita, Teresa, Wendy, Maggie and Rose, I love you all to the moon and back, Mwah xxx
 
Happy Colouring
Nicky x

Saturday 30 August 2014

Autumn Apples


Good day my fine fellow crafters, can you believe its nearly September already? It's certainly feeling autumnal, and so thoughts turn to harvest and harvest festival, traditionally celebrated here in England throughout September, I used to love the service the little ones used to do at primary school,  although I was one of the totally unorganised mothers who scrabbled around the back of the cupboards on the morning to find anything suitable, and in date!!  and then of course sitting in church hoping no-one would notice what produce my lot were traipsing in with!
 
 
So with that in mind, todays card is Harvest Fairy Apple from Mo's digital Pencil. I have coloured him with my Spectrum Noir Pencils.
 
 
Not wanting to quite let go of summer just yet, I have used The Freshly Picked stack of papers
from Die Cuts With a View 
I also used my bunting Epiphany tool from Crafters Companion,( my favourite one!)


The Spectrum Noir pencil colours are:
 
 skin 023, 009, 005, 091
Hair: 087, 096, 104
Nickers: 056, 058
Wings: 017, 047
Leaves: 056, 050, 058
Apple: 017, 056, 020, 024, 027, 033
 
 
Happy autumn everyone but most of all...
Happy Colouring!
Nicky x